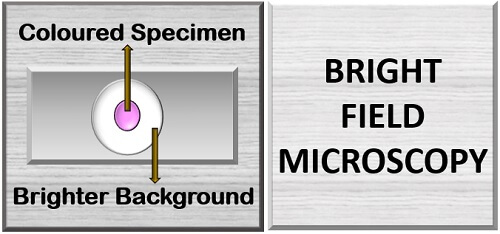
The bright-field microscopy produces an image with a coloured specimen having lightened background. Generally, the microorganisms do not absorb light, but the organisms can absorb the light after staining.
The optical lens, i.e. condenser lens and the path of light coming from the light source illuminator produce a bright-field image with higher contrast and magnification. Bright-field microscope can create a magnified image about 1,000 X to 2,000 X, and the image magnified more than the 2,000 X will become unclear or fuzzy.
In this lesson, we will learn the definition, steps, working, advantages and disadvantages of the bright field microscopy. You will also get to know the meaning of term resolution and some points to obtain good results while working with a bright field microscope.
Content: Bright Field Microscopy
- Definition of Bright Field Microscopy
- Resolution
- Steps in Bright Field Microscopy
- Working
- Advantages
- Disadvantages
- For Better Results
Definition of Bright Field Microscopy
It is defined as the optical microscopy, which is the simplest of all the illumination techniques, wherein a smear (the stained or the dense part appears darker with a white or brighter background). Bright-field microscope is a compound light microscope, which illuminates the background against a stained specimen. It is commonly used in the practical labs to study organisms’ behaviour and characteristics like size, shape and arrangement.
It is a type of light microscopy, where a path of light is very simple, which requires a light source (like a halogen lamp), condenser lens, objective lens and ocular lens. Bright-field microscopy can use either critical or Koehler magnification or illumination system to add contrast to the image.
- Critical illumination: It was the old method, in which a condenser forms an unevenly illuminated image.
- Koehler illumination: It is an advance method, which uses additional optic systems like condenser diaphragm, a condenser lens, collector diaphragm and collector lens to produce an evenly illuminated image.
Resolution
It is the optical lens’s power, which distinguishes between the two particular bodies that held very close to each other. The highly magnified image will not give better results as the picture becomes gauzy. The resolving power increases, as the lines per unit area, appears as distinctive lines.
When there is a small distance between the two distinct objects, the resolving power can be best known. The resolution power can give 1000-1500 times magnified image. Resolving power of the microscope decides the quality of the picture by the objective lens.
Higher is the magnification power; higher will be the resolution of the microscope. The bright field microscope’s resolution is represented as ‘r’ which is equal to the half of the light wavelength by the numerical aperture.
![]()
Thus, the resolution of the bright field microscope depends upon the two factors:
- Numerical aperture: It is the object side aperture, which is equal to the product of refractive index (n) and the magnitude of the angular aperture (represented as sinƟ).
![]()
- The wavelength of light: Shorter is the wavelength of light, higher will be the resolution compared to the longer wavelength.
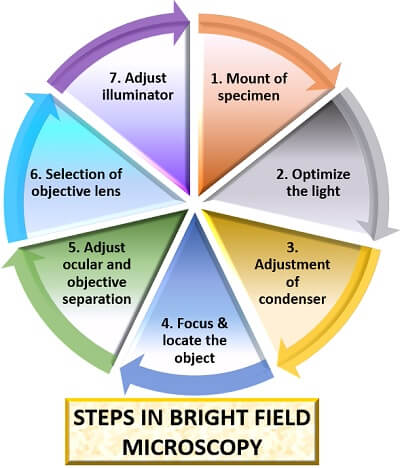
Steps in Bright Field Microscopy
Let us summarize the steps in bright-field microscopy to visualize the specimen.
Preparation of smear
Firstly, the smear is prepared on a glass slide by mixing of inoculum with a drop of distilled water. The thin-film of smear is then heat-fixed and stained. To identify the bacteria, one can perform gram staining. Conversely, for the identification of the fungus, lactophenol cotton blue stain is extensively used. Thus, the “mounting of specimen” refers to the placement of the specimen over the glass slide.
Optimization of light
After air-drying of the glass slide, add oil immersion for the better resolution. Then, place a slide on the stage of a light microscope and adjust it by moving the stage clips. Through the eyepiece, observe the specimen to test whether it is visible or not.
Adjustment of the Condenser lens
To visualize the magnified image of the specimen, adjust the condenser lens of the light microscope. A condenser lens plays a significant role in transferring the incident light from the illuminator to the specimen. The condenser lens must be near to the specimen.
Focus the specimen
To get the specimen’s clear picture, focus the object or organism through the iris diaphragm (controls the diameter of the light coming from the condenser to the specimen).
When the diaphragm is nearly close to the condenser lens, it adds contrast to the specimen. When the diaphragm is farther apart from the condenser lens, it adds brightness to the organism.
The positioning of the specimen
After focusing, locate the specimen relative to the eyepiece by using stage control. The stage control consists of coarse and fine adjustment knobs, which help in the movement of the stage to up, down, left and right directions. The coarse and fine knobs also sharpen the image.
Selection of objective lens
Then, adjust the separation between an eyepiece and objective lens. The distance between the eyepiece and the objective lens is the separation distance, which is adjusted to view the image.
Select one type of objective lens that can give a best-magnified image through the objective revolver. The objective revolver holds three or four objective lenses with different magnification powers like 10x, 40x, 100x etc.
Adjust the Illuminator
The intensity of the light or illumination coming from an illuminator is adjusted by moving the mirror of the microscope for the specimen’s brightness.
Working
Bright-field microscopy is a technique used in the light microscope, which magnifies the dark specimen with the colourless background. To accomplish the bright field microscopy, transfer the prepared glass slide onto the microscope stage. The luminous light will come through the source of light or say through an illuminator device.
The light coming from the illuminator is aimed at the condenser lens (present beneath the specimen). The aperture diaphragm helps to focus and control the light source from the illuminator on the specimen. Some of the light will reflect the specimen, which is then collected by the objective lens. The objective lens first magnifies the light and then transmits it to the ocular lens.
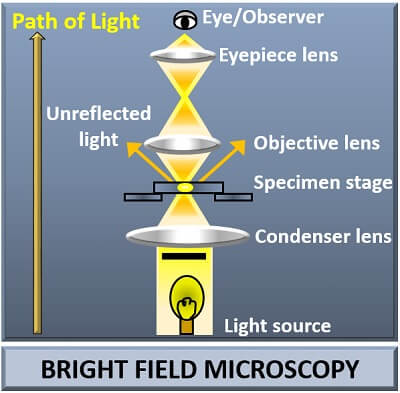
Some of the light will get deflected, while some will get absorbed by the stain and the dense areas in the sample, during this whole method. The intense illumination can increase the magnification of the image. Therefore, the tested organism that has absorbed the part of the light will appear darker, and the remaining, i.e. the background will appear more radiant, in bright field microscopy.
Advantages
- Bright-field microscopy is a simple method to perform.
- It can quickly produce a magnified image of the fixed specimens and live cells.
Disadvantages
- The bright-field microscopy produces low contrast to the image.
- It can give magnification only up to 1300 X.
- Bright-field microscopy has a low apparent optical resolution.
For Better Results
We can adjust the iris diaphragm for the better results, which can reduce or increase the amount of light source getting to the specimen. The use of oil immersion can improve the image’s resolution under an objective lens of power 100X. The use of staining methods adds contrast to the picture. One can also use a coloured or polarizing filter on the light source to highlight the features of the mineral samples.