Fluorescence microscopy uses a fluorescence mechanism to generate an image and optical sectioning for high resolution. It is available in different designs. The epifluorescence microscopes have the most common and simple setup, while confocal microscopes have a sophisticated setup.
Epifluorescence microscope has prominent applicability in different laboratories, which allow excitation of reactive dyes and detection of the fluorescent light emitted through the same objective.
Therefore, the working of a fluorescent microscope depends upon the reactive species within the fluorescent dye, which absorb photons of the exciting light (low wavelength) and later transmit fluorescent light (high wavelength).
There is a short delay between the excitation and emission of fluorescent light that is generally negligible (takes nanoseconds). This post mainly explains the definition, working and phenomena of fluorescence. You will also get to know the basic components of the fluorescent microscope, along with its advantages and limitations.
Content: Fluorescence Microscopy
Definition of Fluorescence Microscopy
It refers to the microscopic technique that uses chemical substances that stain the specimen by absorbing white light of a specific wavelength and emitting light of a longer wavelength to form an image. Fluorescent dyes are the chemical substances used in this advanced microscopic method. Chemical particles within the fluorescent dye come into action under visible light.
Some portions of the specimen may take up the stain, while a few portions may not after staining the specimen with fluorescent dyes. Therefore, the portion stained with fluorescent dye will appear fluorescent green against the dark black background, while the unstained portions will remain invisible.
Fluorescence Microscopy Principle
The working principle of fluorescence microscopy is summarized below:
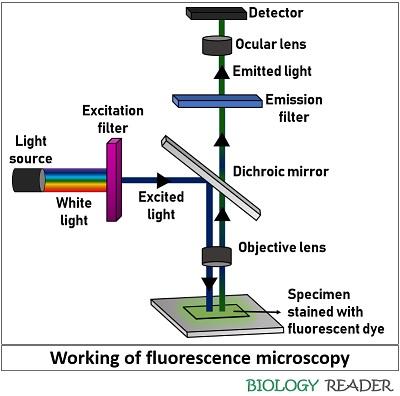
- Firstly, a light source falls onto the excitation filter.
- The function of the excitation filter is only to pass the light of a particular wavelength that can excite the fluorescent molecules tagged in the specimen.
- Then, the excitation light falls onto the dichroic mirror.
- A diachronic mirror reflects the emitted light towards the objective lens and then onto the specimen.
- As the specimen is stained with a fluorescent dye, the fluorescent molecules will excite and emit a high wavelength light in a reverse manner.
- The emitted light will first go through the dichroic mirror that permits most of the green light to pass along with some blue light towards the emission filter.
- The emission filter only permits the green light of a longer wavelength and totally rejects the blue light.
- Finally, the green light goes to the ocular lens and finally to the detector.
- The detector detects and allows the green light to fall back onto the specimen.
- Thus, the majority of specimens appear fluorescent green against a jet black background.
Fluorescence
The working of a fluorescent microscope depends upon the principle of fluorescence rather than scattering and reflection of light. Some chemical substances or reactive dyes possess the property of light absorption and emission, which can undergo the fluorescence phenomenon. George G. Stokes was the first to study the mechanism of fluorescence and also coined the term in 1852.
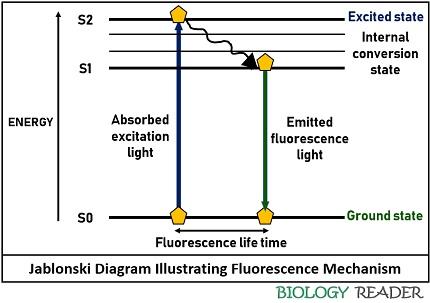
- Fluorescent molecules absorb the light of a short wavelength and excite due to high energy photons through the excitation mechanism. Here, the light triggering the fluorescent particles refers to the exciting light that ionizes X-rays and UV-rays.
- On the other hand, fluorescent molecules emit high wavelength light via an emission mechanism. Here, the light reflected by these chemical substances after absorption of photons merely refers to the emitting light generally in the form of visible light.
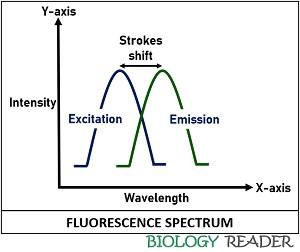
The fluorescence is achieved when the high energy photon molecules in the excited state will go back to their normal ground state by releasing some energy in the form of fluorescence. The difference between the phase of excitation and emission is known as “Strokes shift”, which can be relatively short and sometimes far apart.
Fluorescent Microscope Parts
Typical components of a fluorescence microscope are as follows:
Fluorescent dyes: These are the chemical compounds called fluorophore or reactive dyes. Fluorescent dyes possess a property of fluorescence, by which they can form a fluorescent image by emitting highly contrast visible green light after getting excited by the highly illuminating UV light. A fluorophore highlights a wide range of biomolecules like antibodies, nucleic acids, proteins, etc. For instance, Hoechst and phalloidin dyes stain actin fibres in mammalian cells.
Light Source: It includes xenon arc lamps, mercury-vapour lamps, lasers, and high-power LEDs. The sophisticated confocal fluorescent microscope mainly uses laser light. On the contrary, a simple epifluorescent microscope uses a light source from xenon lamps, mercury lamps, and LEDs. Epifluorescence microscopy has wide applicability in different laboratories.
Excitation Filter: The excitation filters are designed with high-resolution capacity and interference optics. It passes the light of a shorter wavelength, which the fluorescent dye could absorb. Also, it blocks the other sources of exciting light.
Dichroic Mirror: It is a dichromatic beam splitter that works as an interference colour filter. Thus, a dichroic mirror selectively reflects or transmits light of determined wavelengths. It generally sets at an angle of 45 degrees along the path of light coming from the exciter filter in the fluorescent microscope.
Emission Filter: It has a coloured glass or interference coating or a combination of both. It works as a barrier filter that only permits the fluorophore’s passage and blocks excitation light.
Advantages
- Fluorescence microscopy helps in the study of cell behaviour.
- It is the specific microscopic method that highlights the biomolecule of interest.
- The fluorescent microscope can also highlight the image of particular structural components within the microscopic organisms.
- It is a highly sensitive technique that can detect around 50 molecules/µm3.
- Fluorescent dyes tag biomolecules differently, by which we can analyze or track the physiochemical properties of multiple biomolecules simultaneously.
Disadvantages
- It only allows the observation of specific structures inside a cell tagged with the fluorescent dye.
- The photobleaching due to the electron excitation during the process of fluorescence may affect reactive molecules of the fluorescent dyes. As a result, the reactive dyes might lose their chemical property of fluorescence emission intensity.
- The cells are susceptible to the phototoxic effect after staining with fluorescent dyes, as the fluorophore molecules absorb the high energy photons from the short-wavelength light.
Conclusion
Fluorescence microscopy uses a fluorescent stain, unlike other microscopy techniques that employ ordinary stains. Its working depends upon the excitation of the absorbed light and the emission of the fluorescent light to produce a high contrast image with high resolution.
Thus, the first light of low wavelength having many energy molecules illuminates the sample in fluorescence microscopy. Eventually, reactive species in the specimen excite to emit a second light of longer wavelength having lesser energy content. Here, it is important to note that the filtered emitted light out of total exciting light produces an image.
Hi! its a fantastic project.
It is a very useful blog, and I was thinking of purchasing a digital microscope for my school chemistry, but you helped me a lot thanks.